Wednesday, April 25, 2012

Everything's Better in 3-D

When Cindy brought home 3-D fabric from the shop a few months ago I thought it was really neat but I just wasn’t inspired.   Fast forward to a few weeks ago, I was standing in the shop staring at it and it hit me… pajama pants!  What kid wouldn’t want 3-D pajama pants? 
That evening Linus and I went over to my cousin’s house where I shared with her my “Coming At You in 3-D” by Hoffman California International Fabrics.  While we ooed and awed over my fabric finds, her geeky engineer husband debated how the 3-D fabric was made and then he came up with the most brilliant idea.  These aren’t just pajama pants they are “3-D MOVIE NIGHT PANTS!”

Taking his job pretty seriously!


Now we just finished our basement and I’m thinking when these pants come back from the shop we’ll have to rent a 3-D movie just for the occasion.  I used the Basic Kids Pants Tutorial from made by Dana.  If you’ve never been on this site her tutorials are wonderful and she’s great at showing you how to make your own patterns. 

These pants were so fast and easy!  I'm completely hooked! I'm hoping to get a pair of flat front shorts made for Linus out of one of Adam's old plaid shirts. 

Ok just one more picture!

"Finally, I get the remote."
If you haven't seen the 3-D Fabric you really do need to check it out yourself. Besides spaceships and planets, there is also dinosaurs, fish, and flowers with honeybees.

Tamara

Wednesday, April 18, 2012

Spreading Joy

Last evening was chaotic and with all the events rolling around in my head my night was pretty restless so I thought it might be a little therapeutic to take time to blog this morning before work.  No worries we’re all fine, it was only a community meeting, but it did get me thinking about how grateful I am for some of the wonderful people I know.

In January one of those “repost things” was floating around Facebook.  I never do those but this one intrigued me.  You commented on the post and the person would make you something handmade this year.  You then had to repost and make something for the first five people who commented on your post. 

So the quilt in my last post was my first completed project for this challenge.  After it spends some time in the shop it will go to our old neighbor, Kim.  Kim and her husband are wonderful and it was such a blessing to live by them for a short while.  They were both Purdue alums with masters in child development.  While we were there they had their first child, a girl who is a couple years older than Linus.  Whenever I get frustrated as a parent I think back to Kim and her husband.  I admire their patience and calmness as parents.  It often seemed every word or action was deliberately thought out.  They were constantly teaching their little girl about the world around her whether through including her in the conversation, discipline, or even just chores.  I’m not sure I had ever closely watched someone do this with a child under 2. (I have a younger brother and sister, but when I was 8 I really didn’t care about this kind of thing.)  Kim was actually the first person I told when I was pregnant with Linus besides Adam of course.  I’m not sure why but, we were playing with chalk with her daughter and I just blurted it out.  Kim taught me or maybe rather reminded me in tough or frustrating situations to step back breath and collect yourself.  I don’t know if she realized she taught me that, but after all, “Actions speak louder than words.”   To me Kim personifies the idea of leading by example for her daughter and for everyone around her. 

I often times make Christmas gifts for people but let’s face it I’m usually finishing up the last of them in January.  Making a gift for a specific person in the middle of the year has allowed me to think about the art of gift giving.  Kim is also a photographer and the purple batiks in this quilt remind of some of the beautiful nature she photographs.

My challenge to you is this month start a project for someone in your life you maybe wouldn’t normally give a gift to but has meant a lot to you.  It doesn’t have to be anything big, but believe me it won’t just fill their heart, but also your own.

Monday, April 16, 2012

Book Review: Big Blocks, Big Quilts

A few weeks ago my mother-in-law handed me this book from the shop to review.
Big Blocks, Big Quilts by Suzanne McNeill has 11 patterns all using layer cakes. Disclaimer: I’m not a huge pre-cuts fan.  I mean you are never going to like every single fabric in a pre cut layer cake and I want to pick out my own fabric.  I may be sold on pre-cuts now and here’s why.

I made Wee Play Rainbow from a Tonga Treats layer cake.  I loved it!  It was super fast and easy, and I think using a layer cake pushed me to use fabrics I wouldn’t normally pick out on my own.
The book itself is a good resource.  The instructions for making a mitered border were really good, and there was a whole section on just basics like using a rotary cutter and layering a quilt.  I enjoyed reading through some of the basics, reminding myself not to iron but to press.  It would also be great for someone just starting to quilt as a reference book with some good patterns as a bonus. The author also included a few tips for sorting your layer cake.
I had to include this one to show off Linus is and my new couch!
I ended up pairing lights and darks in the quilt I made and I’ll share my own tip on sorting the two.  When I think I have my lights and darks figured out I lay them out on the floor at night* alternating between the two like a checkerboard.  Then I turn off the light in my sewing room but leave a light on somewhere down the hall.  In the dark you can only see value and not color helping you better decipher the lights from the darks.
There's a couple of more quilts in this book I really love, like Cranberry Wishes and Fresh Squeezed. Hmm...I might need to go shopping for some more layer cakes this weekend.

Tuesday, April 10, 2012

Break Time!

I’ve been working on quilting a good sized quilt last night and tonight but I wanted to take a break to show you some of the new yarn at the shop.  Stop by for a visit and see how nice the newly rearranged yarn section looks!


This is Knitting Fever Petals Yarn and let me tell you it is so cool!  I’m not a knitter and won’t even begin to try to understand exactly how this works but its basically self-ruffling.  See Penny for a free pattern or look here for a video from Knitting Fever.

Next up is this lovely Katia Triana which is similar concept to the Petals.  I really love the blue shades and doesn't it look stellar on Lyneen.


And of course I can't forgot the sock yarn.  Here's some new sock yarn with a sample of the wide range of colors.

  
Ok one last one and then I have to get back to quilting.  I don’t remember what this yarn was but maybe someone can chime in I just thought it looked like a lot of fun!

Happy Quilting!
Tamara

Sunday, April 1, 2012

Easter Egg Wall Hanging Tutorial + Giveaway

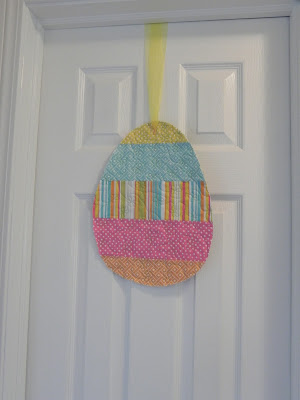
I am sincerely sorry!  With real work, the warm weather and some deadline sewing (Darn those bridal showers!)  I’ve been MIA lately.  But I wanted to make sure to share this cute Easter Egg wall hanging with you before it was too late.


What You’ll Need

1/8 yard of 5 assorted prints

½ yard of batting

½ yard of fabric for backing

Ribbon

Cut a 4” inch strip from each of the 5 fabrics.  Sew strips together length wise.  Layer backing fabric, batting and pieced strips and quilt. (I love small quilting projects like this because it gives me a chance to try new free motion quilting designs or perfect ones which need a little practice.)

Next you will need to create an egg pattern out of freezer paper.  I free handed mine, but you are welcome to stop by the shop and trace mine.  My egg is about 15” high 11” at the widest point.  Remember the bottom is wider than the top of the egg.

After you’ve made your freezer paper egg pattern iron it on to your quilted fabric so the strips are running horizontally, and cut around it with pinking shears.

Yes it might have been really late at night when I finished this.

Now for the fun part! You should be able to get three to four eggs out of your quilted fabric.  I played around with a couple of different ways to attach the ribbon.
The first way I crisscrossed the ribbon at a point towards the top of the egg, placed a large green button on top and hand stitched the button and ribbon in place.


The second way I just a made a button hole at the top.  (And if you have never made a button hole on your Janome come into the shop for a demonstration.  It is soooo easy!) Then I fed the ribbon through the button hole.
One last trick, I was super excited to use.  I found this idea on Pinterest of using a 3M hook on the back of the door to hang a wreath or anything. Props to Jeralyn atLemonade for this great idea! So no nail in the door and no ugly hook on the front!


Giveaway: Well since I made three of these.  One is hanging at my house, one is at the shop and the third is just looking for a happy home!

I realize Easter is just around the corner so this will have to be a Lightning Giveaway and I will even mail it to you since I don't have time to run it down to the shop. 

Leave a comment about any Easter traditions you have by Monday night.  Tuesday I'll pick a winner and no later than Wednesday I'll have it in the mail to you!

You must be a follower to enter!

Ok so which do you like better? I think I like the button hole method the best.
Tamara